
Excel Date & Time Functions: Part 1
Struggling with dates & times in Excel? We've all been there - this guide will help demystify these challenges.

This is the first of a multi part series on using Dates & Times in Excel.
Want to get the most out of this lesson? Download the sample data so that you can follow along.
Given Excels authority as the leading and most widely used spreadsheet program on the planet, it is natural for dates & times to be a topic of discussion. With Excel there is some frustration when it comes to this topic. This is because when it comes to Dates & Times, Excel was built many years ago and emulated a competitor -LOTUS 123. Because of this it has some really oddball bugs.
The best way to move forward is to become familiar with the bugs but also to learn how Excel manages Dates & Times. Once you do this managing this issue becomes much easier and less frustrating.
Excels Date Bugs
1. The Leap Year Bug:
Excel, like many systems, considers 1900 to be a leap year, which it wasn't. This was a compatibility issue with the software Lotus 1-2-3, which Microsoft wanted to maintain when developing Excel. Therefore, if you're dealing with historical data and using dates in the early 20th century, be aware of this off-by-one-day discrepancy.
2. The 1900 vs. 1904 Date System:
Another thing to note is the difference between the 1900 Date System (default in Windows) and the 1904 Date System (default in Mac). In the 1900 Date System, the start date is January 1, 1900. In contrast, the 1904 Date System starts on January 1, 1904. This might cause issues if you're sharing Excel sheets between different operating systems and you're working with dates before March 1, 1904.
3. Errors with Incorrect Date Formats:
Sometimes, Excel might not recognize a date because of format inconsistencies. For example, the date format MM/DD/YYYY is typical in the United States, while other regions use the DD/MM/YYYY format. Excel may interpret "03/04/2022" as March 4th or April 3rd, depending on the system's regional settings. This can lead to misunderstandings and calculation errors.
4. Date & Time Limitations:
Excel's date and time capabilities are based on a numeric system where "1" represents January 1, 1900, and each subsequent integer represents the next day. However, Excel cannot handle dates before the year 1900, so historians and paleontologists beware!
For time, Excel sees one day as a value of 1, so an hour is represented as 1/24, a minute as 1/1440, and a second as 1/86400. This can sometimes lead to rounding errors in time calculations.
4. The “20/30” Rules
The handling of two-digit years in Excel can also cause confusion, especially when dealing with data spanning several decades. Excel employs a system known as the "20/30 rule." When you enter a two-digit year, Excel interprets values between 00-29 as the years 2000-2029 and values between 30-99 as the years 1930-1999.
This rule is based on the idea that the closer 20-year span is more likely to be relevant, given the program's release and peak usage period. However, it can lead to inaccuracies if you're working with historical data or planning far into the future. Always consider this rule when inputting or analyzing dates in Excel to avoid potential misinterpretations or inaccuracies.
Getting the Current Date & Time
Now that we have the bugs out of the way, let’s start getting into some real work. The most basic functions tell us the exact day & moment we are living in. They are:
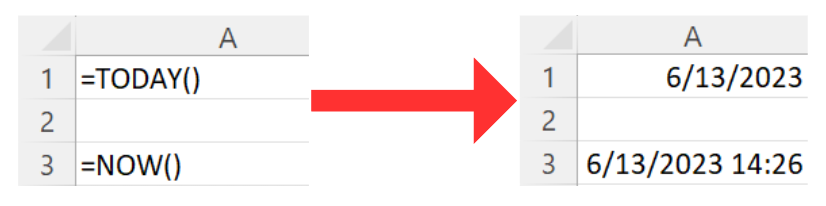
=TODAY()
=NOW()
=TODAY() returns the current date in the format of month/day/year. For instance, if today is June 13, 2023, the formula =TODAY() would return 6/13/2023 and assumes it is 12:00AM. It's important to note that this function is dynamic and will automatically update the date each time the worksheet is calculated or each time you open the Excel file.
=NOW(), on the other hand, is slightly more detailed and provides the current date and time. For example, if it is currently 1:30 PM on June 13, 2023, the =NOW() function would return 6/13/2023 13:30. Like the =TODAY() function, =NOW() is also dynamic and will update each time the worksheet is recalculated or the file is opened. However, if you want to keep a timestamp and prevent it from updating, you would need to use a different approach like using keyboard shortcut (Ctrl+Shift+;).
Both functions do not require any arguments to operate, making them very straightforward to use. They can be used on their own or in combination with other functions to perform more complex calculations involving the current date or time.
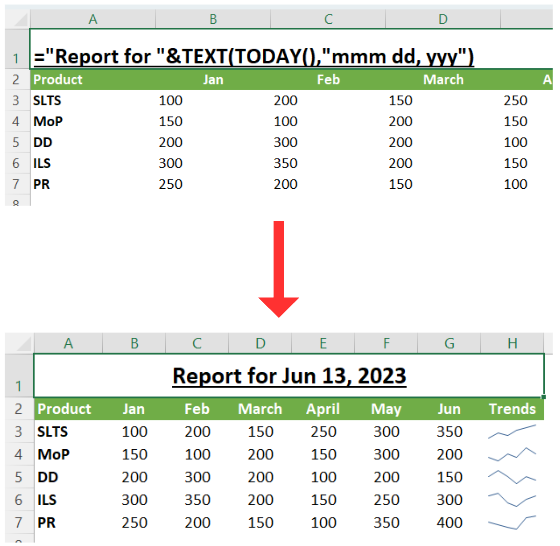
One very popular use of these functions is to incorporate them into a text string. For Example when you want to label a report and ensure the reader knows it is up to date. In this example we use the =TODAY() formula nested inside of a Text String with a TEXT formula to label the top of a report. The syntax used is:
="Report for "&TEXT(TODAY(),"mmm dd, yyy")
Calculating the Difference Between Two Dates
From calculating age to figuring out the time left on a project, being able to calculate the difference between two dates is super important. The easiest way to do this is to use the =DATEDIF function.
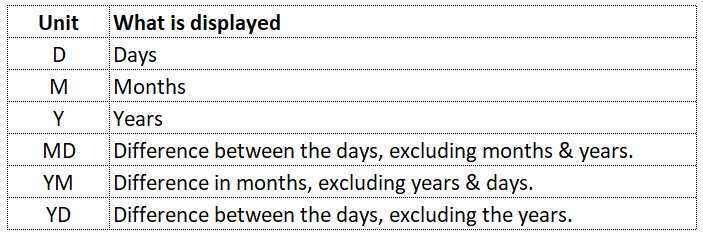
The syntax for this function is =DATEDIF(start_date, end_date, "unit").
The start_date and end_date parameters are self-explanatory, representing the beginning and end of the period you're calculating.
The "unit" parameter, however, requires a specific letter to denote the unit of time you want to use:
Examples:
Calculating age
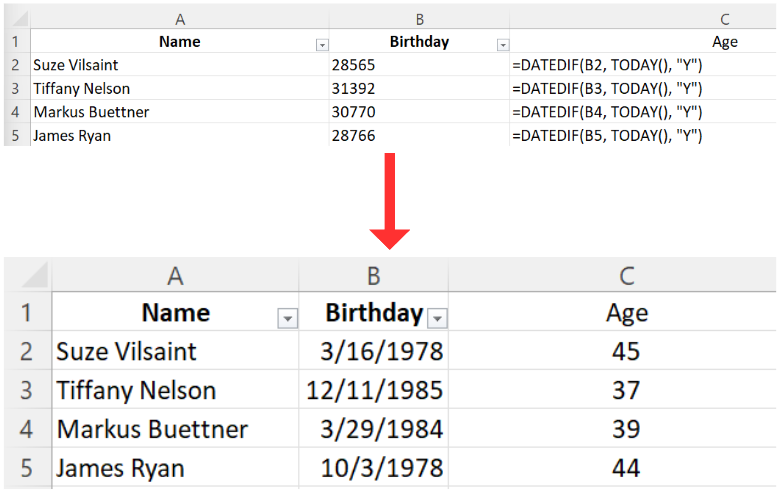
Perhaps the most popular application for =DATEDIF is calculating a persons age. Lets take a look at a simple example.
In this case we are calculating a persons birthday to the current date, so we use =TODAY() nested inside of the =DATEDIF function and choose the “Y” unit preference. It’s also interesting to now the “Birthday” Column actually changes to how Excel reads dates when I change the view to show formulas.
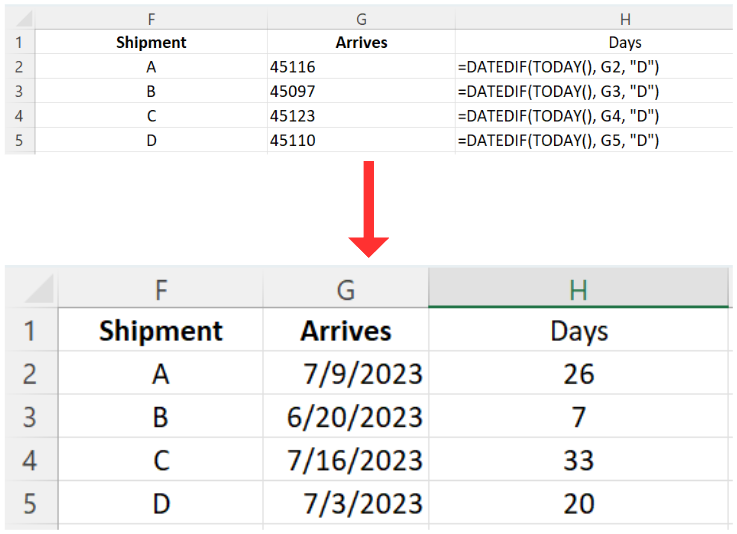
Days until a shipment arrives
=DATEIF is useful for more than just figuring out some ones age. What if we wanted to know the amount of time it will take for delivery to arrive?
We would essentially follow the exact same steps as above with the following exceptions:
We would use the =TODAY() function as the start date.
We would choose the “D” unit (for Days) to provide us our answer.
We covered a TON in this weeks lesson. The purpose was to lay the foundation for diving deeper into these functions. Because of Excels way of handling Dates & Times it is important to lay this foundation before diving any deeper. We will go even further on this topic next week.
In the mean time, make sure you practice using these date functions! This is easy to do - just download the sample data set included with this lesson and get to work. Apply what you have learned right away and it will stay with you.
I hope you enjoyed this lesson. There are a few other ways I can help you master Excel:
Do you have any burning questions about Excel that you want answered? Send your question to hello@learnexcel.live. I will address it in a future newsletter.
Do you or your organization need a little spreadsheet help? Book a 1 on 1 with me here.
Want to learn more Excel Shortcuts? I have created something special (and free) for you: The Best Damn Excel Shortcut Sheet
Til next time ✌️
-Ajay
The Excel Ninja 🥷
PS - If you like these lessons please share with a friend or two...