
TED #039: Slice & Dice your Text with =TEXTSPLIT()
Breaking down the nuances of =TEXTSPLIT(), turning bulky text into manageable pieces.


Staring at a chunk of text inside of an Excel data cell and needing to split it up is a common occurrence. If you have been around Excel long enough you have likely used some of the old functions like =LET(), =RIGHT(), =MID(), or others to achieve this. It also means you very likely have been frustrated by how challenging it is to use these functions to achieve your desired results. They get long. They get confusing. They make you want to smash your keyboard! Luckily for all of us, Excel’s =TEXTSPLIT() can help alleviate some of these challenges. Lets take a closer look.
What is =TEXTSPLIT()?
Simply put this function allows a user to divide text based on a specific delimiter. Here is the syntax:
=TEXTSPLIT(text, col_delimiter, [row_delimiter], [ignore_empty], [match_mode], [pad_with])
text: The text you want to split. This will commonly reference a cell.
col_delimiter: The character or characters to use as a reference for splitting the text across columns.
[row_delimiter]: The character or characters to use as a reference for splitting the text across rows.
[ignore_empty]: Skips over values that would return an empty cell.
[match_mode]: Determines whether the function should use case sensitive vs non case sensitive with the delimiters
[pad_with]: The value to enter in the event an error is returned.
Basic application
Let’s look at a basic application. In this case we have a student and preference for color, size, etc. for a t-shirt. We want to break the data out of a single cell and into multiple columns. We will use =TEXTSPLIT(). Here is the syntax:
=TEXTSPLIT(A2, ",")

Pro tip: It’s always good to nest this formula with =TRIM(). This is because there are often spaces around the delimiter and the =TRIM() function will remove them. I won’t be doing this in the newsletter.
Curly brackets for multiple delimiter applications
As we all know data cleaning is not always this simple. While we would always expect the delimiter to be the same that isn’t what always ends up happening. There will always be data that gets messy with multiple delimiters. Luckily for us =TEXTSPLIT() is designed to handle that. In the following example I applied the above formula to this set of data. Here is what resulted:
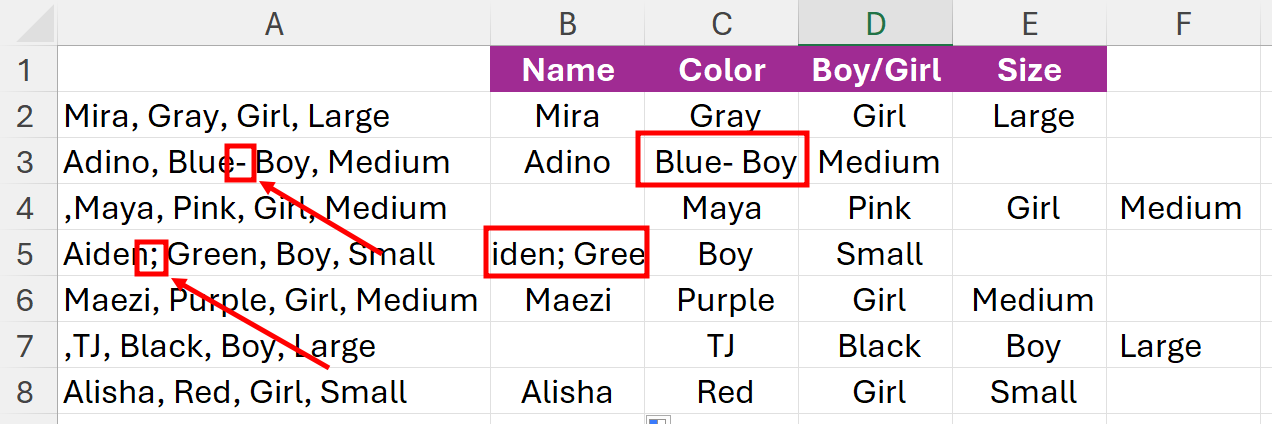
As you can see in these two rows it looks like there are other delimiters. In this case a “-” and a “;”. This is easy to fix - we can adjust our syntax to include multiple delimiters. We will be adding curly brackets inside of our syntax. This indicates to the function that it should look for multiple delimiters. Then we will list out the delimiters. Each delimiter will be entered in quotation marks and separated by a comma. Yes, it will hurt your eyes to look at. I made sure to highlight each delimiter to make it easier to read. Here is the syntax:

This time when we enter the function is properly splits the text as desired! But now we have another problem. It looks like we have some blank cells.
Ignore blanks
As I mentioned before cleaning data is always going to have challenges beyond the basic use of the function. In this case two of the lines have a delimiter that exist before the first name. This pushes our data out beyond the table. In order to fix this we will activate the [ignore_empty] part of the syntax. Here it is, updated:
=TEXTSPLIT(A2, {",",";","-"},,TRUE)
This will pull the data forward as desired and place it into the correct columns. This is because blank results were ignored.
Splitting into Columns & Rows
Let’s look at another example. In this case we have the list of students and the number of shirts they sold. When the data was entered it was done in a single cell. Here is the data:
Data in this format doesn’t do much for us. What we want is a table with the names in one column and the number sold in another column. To do this we will make use of the [row_delimiter] option. When we look at our data again we observe the following:
Because we want the names in the first column and number in the second column we will use the “-” as the delimiter. This will break up the name & the qty into two columns.
Since we want to create a new row for each name we will use the “and” as a delimiter. That’s right, with =TEXTSPLIT() you can use a word as a delimiter also!
Here is the syntax:
=TEXTSPLIT(H1, "-", "and")
You’ll notice that Maya has an error with her quantity. This is because no amount was entered for her. This is easily solved by using the [pad_with] part of the syntax. We will simply use the words “No Data”. Here is the syntax:
=TEXTSPLIT(H1, "-", "and",,,"No Data")

As you can see we have replaced the error message with our preferred messaging.
Thanks for reading this newsletter. The =TEXTSPLIT() function simplifies splitting text into manageable pieces of data. Practice does make perfect so be sure to try out the examples we covered today. To help you with that I created sample data for you to use. Here is a link so that you can follow along:
When you’re ready, there are a few other ways I can help you master Excel:
Do you have any burning questions about Excel that you want answered? Send your question to ajay@theexceldojo.com. I will address it in a future newsletter.
Do you or your organization need a little spreadsheet help? Book a 1 on 1 with me here.
Also, please be sure to follow me on your favorite social media platforms! It’s with your support that I can continue to provide you with this content!
Til next time ✌️
-Ajay
The Excel Ninja 🥷
PS - If you found this newsletter informative please share with a friend or two...
Note that if there are spaces adjacent to your delimiter, you should include them in the delimiter. Otherwise, the spaces are left in the output text.
TEXTSPLIT("Mary, Bill, Pete", ",") with no space in the delimiter "," results in {"Mary", " Bill", " Pete"} with spaces before " Bill" and " Pete".
TEXTSPLIT("Mary, Bill, Pete", ", ") with a space in the delimiter ", " results in {"Mary", "Bill", "Pete"} with no spaces.
Perhaps you mentioned TRIM(), and I thought of it. But using the precise definition of the delimiter is probably most efficient.